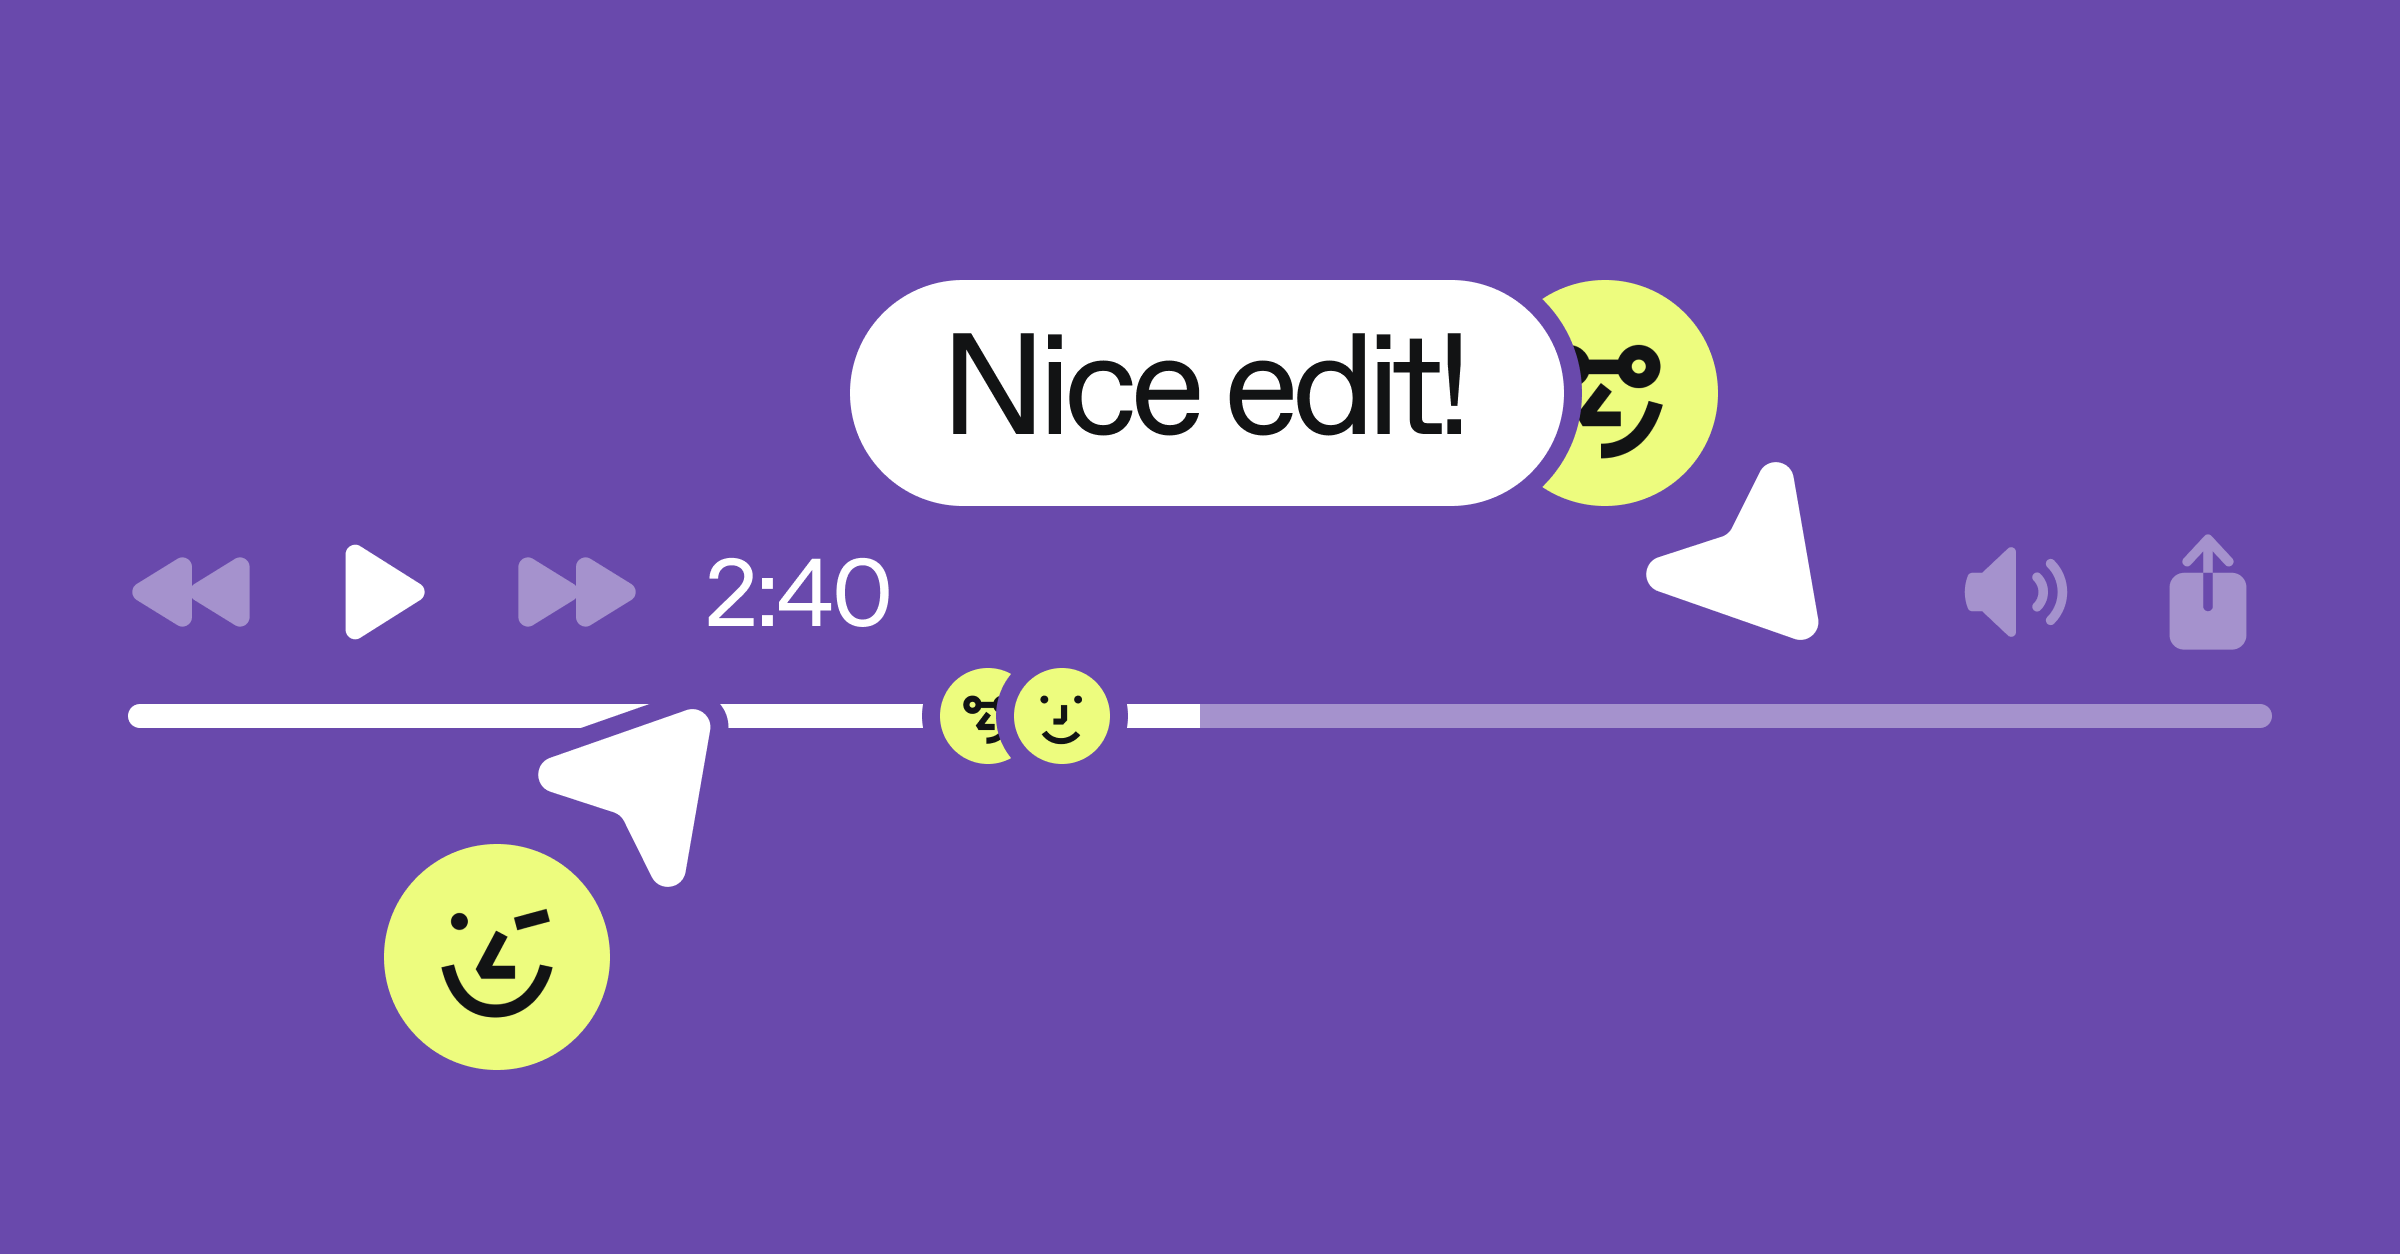
In this blog post, we’re going to do a quick run through building a commenting feature on a video. We’ll use Cord Threads to handle the commenting, Cord Pins to handle the display of those comments, and a couple of new features we recently shipped: metadata and native CSS support. We won’t touch on all the details, but will highlight those four pieces to show the power of Cord. We should end up with something like this 👇

Context matters
For video commenting, we want to be careful about when and where we show comments. A message with a spoiler from the end that pops up at the beginning of the video is no good. Similarly, trying to comment that you like a particular pair of shoes on a scene with multiple shoes without being able to clarify which particular pair you like is also no bueno.
Without the ability to indicate when and where your comment is relevant, you can’t really build an experience that enables useful collaboration on the video. Thankfully, with Cord’s metadata capabilities, we can incorporate timestamp and location information into our comments. It is as simple as attaching metadata to our Threads.
Let’s look at how we can capture some information about the video when we make comments and how to store it using Cord.
Defining metadata
At Cord, we use TypeScript, so we can easily define what shape we want our metadata to take. Here, we care about two things: the location on the video where the person clicked and the time they did so. For videos, we want to capture where the user clicked as a percentage rather than as absolute coordinates so that we can keep the comment in the appropriate place across different people’s browsers and video sizes.
TypeScriptexport type ThreadMetadata = {
xPercent: number;
yPercent: number;
timestamp: number;
};Capturing the data on a click
Now that we’ve defined our data type, let’s look at capturing that data when the user clicks.
JavaScriptonClickHandler(e) {
/* Some preprocessing code */
const rect = e.target.getBoundingClientRect();
const x = e.clientX - rect.left;
const y = e.clientY - rect.top;
const timestamp = videoRef.current.currentTime;
const metadata = {
xPercent: (x / rect.width) * 100,
yPercent: (y / rect.height) * 100,
timestamp,
};
/* Some postprocessing code */
}With that code, we’ve captured where the user has clicked as a percentage of the overall video element, and the timestamp of when. We now need to pass that on to the Thread when we create the message.
Creating a thread with metadata
This one’s pretty easy, and is actually the first time we’re interacting with Cord. So far, all of the above was interacting with a <video> element or deciding what our data would like. Let’s get to the fun part.
JavaScript<Thread
metadata={metadata}
/* Other properties */
/>That’s it. With one line of code, we’ve now attached that metadata to the Thread. Whenever we get events about that thread, whenever we go to render it, whenever we want to handle clicks on it… we now have access to that metadata.
Ready to roll 🎥

Now that we’ve got our data set up, let’s talk about displaying it.
We want to build an experience that looks good on the video, displays at the right place and time, and quickly gives you the information you care about. To do that, we are going to display Pins on the video where a user has commented. When a Pin is clicked, we’ll open up the Thread at that location.
However, we don’t want to clutter the screen with pins, so we’ll be smart about how we show them. If the time on the video is close to the time of the comment, let’s put a Pin on the video. But if the video is currently at a different time, let’s put the Pin on the video timeline so that users can tell it’s there, even if they’re not on the frame with the comment.
Open the Thread
We want to display at most a single open Thread at a time. This helps keep the UI uncluttered. To do this, we’ll track which Thread is currently open, and change the open Thread when a Pin is clicked. Because the Pin has an onClick handler, when it’s clicked, we can set the openThread to be the id of the Pin’s Thread. To control whether a Thread is shown, we can just use the display property. If the Thread is open, we’ll display it block. Otherwise, we’d set its display to none. This way, only one Pin with a single Thread will be open at a time.
JavaScript<Pin
threadID={id}
onClick={() => {setOpenThread(id)}}
/* Additional Pin properties */
>
<Thread
threadID={id}
style=
/* Additional Thread Properties */
/>
</Pin>Where my Pin at
Now that we can open a Pin to display a Thread, let’s determine where we want the Pin to be drawn.
First, we need to determine if we’re displaying the Pin on the video or on the video timeline. In our case, we thought a three second window around the time of the comment would work well. The Pin would show for enough time for someone to see it in context, but not linger so long that it was no longer relevant.
So within that window, we’ll show the Pin where the user clicked to leave the original comment. If it’s outside that window, we’ll just show it on the timeline. We can grab the timestamp from the metadata we stored on the Thread and compare it against the currentTime of the video.
JavaScriptconst displayOnTimeline = Math.abs(threadMetadata.timestamp - currentTime) > 3;Now let’s set a CSS class on the Pin to indicate whether a given Pin is to be shown on the video, or on the timeline. Let’s also pass some CSS variables in the style property of the Pin (the code for getPinCSSVariables is elided to reduce code size, but computes three variables we will use in display below).
CSS<Pin
className={cx(
displayOnTimeline ? 'pin-on-timeline' : 'pin-on-video',
)}
style={getPinCSSVariables(metadata)}
/* Additional Pin properties */
>To the Stylesheet!
We now have all the information available to us in CSS to display Pins directly on the video when appropriate, and on the timeline otherwise. First, let’s look at displaying on the video.
CSS.pin-on-video {
top: var(--pin-y-percent);
left: var(--pin-x-percent);
}Because we track where a comment was left as a percentage of the video size, we can just tell the Pin (when it’s on the video) to position there.
For the placement of the Pin on the timeline, we need to be a little more clever, taking into account the length of the video and how far along that timeline you may be, but again, we have all that information. Here the --pin-time-ratio variable is computed as the ratio of the timestamp to the total length of the video.
CSS.pin-on-timeline {
bottom: 22px;
left: calc(100% * var(--pin-time-ratio));
}Customizing the Pin look
Lastly, we want to make the Pin on the timeline a little smaller so it’s not as intrusive in the video. Thankfully, we can again do all of that with CSS ✨ We can target the Pin when it is on the timeline and the avatar we display in a Pin within that.
CSS.pin-on-timeline .cord-avatar-container {
border-radius: 50%;
border: 2px solid #010101;
height: 24px;
width: 24px;
}Take it for a spin
We’ve barely touched on what you can do with the power of Cord components and the integrations that are possible. To go see a more full featured version of this, please check it out in our sample app, or find the source code on github. There, you can see integration with our Composer, ThreadedComments, and more.
If you’re interested in building for yourself, either reach out to our sales team, or sign up to our console to get started today.