 cord
cordA Friendly Introduction to RLS Policies in Postgres
Isaac Harris-Holt, Founding Engineer at Stairpay, demonstrates how they use RLS policies to reduce the need for extra services and keep latency low.

At Pluto, we build Stairpay, an app for residents of affordable housing schemes in the UK.
When writing applications, one task you’ll face is preventing data leaks. How do you make sure your users only see what they’re supposed to? It wouldn’t be great if I logged into my email app and saw all my boss’ emails (or it might be if I was good at my job 😉).
One common way of securing your data is having an access control layer between your API and your database. This could be anything from access policies enforced by your ORM to a separate microservice that makes judicious use of [where] clauses when querying your database.
For the most part, this works. But what happens if one of your engineers forgets a [where] clause or access requirements change and you suddenly have to go and find a million different places to change your access levels? Having a separate access control layer can also add complexity to your code base — depending on how you implement it, you may now have to maintain an additional module with its own set of concerns, design patterns, idioms, and so on.
Introducing Postgres’ row-level security, or RLS policies. RLS policies are access policies that you define at the database level, removing the need for an external service and keeping latency to a minimum.
How do RLS policies work?
"In addition to the SQL-standard privilege system available through GRANT, tables can have row security policies that restrict, on a per-user basis, which rows can be returned by normal queries or inserted, updated, or deleted by data modification commands."
— PostgreSQL documentation
When you query a table protected by RLS policies, Postgres will validate each row the query returns against the policies on the table. Any rows that do not pass the check will be stripped from the response.
Example
Let’s look at an example. Consider the following table:

I could then apply an RLS policy to the table that only allows me to view data on lions.

Now, if I run [select * from animal] as a user in the [authenticated] group:

Great! We’ve managed to restrict the data I have access to. But that [create policy] statement is a little confusing. Let’s deconstruct it 🤓:

This one’s easy! We’re creating a new policy called [allow anyone to read lions]. You can call your policies whatever you like, but it’s worth being descriptive.
That said, for performance reasons, it’s best to only have one policy per group (we’ll discuss this later) per table per operation - [select, update, insert, delete] - so you may choose to opt for a consistent naming scheme, e.g. [table_name: select.]

Again, quite straightforward — this policy is for the [animal] table. Each policy can apply to only one table.

This part of the query decides when the policy will run. In this case, we want records to be checked against the policy when we use a [select] statement.
The other available options are [insert], [update], [delete] and [all]. The first three cover their respective statements, and [all] will apply to all the CRUD operations against the table.
If you use [merge] statements in your code, policies for any of the CRUD operations may be applied depending on what the [merge] statement is doing.

This is where things get interesting. There are two ways a policy can be applied to a table — as a [permissive] policy or as a [restrictive] policy. Policies are permissive by default.
Each does roughly as you’d expect — permissive policies define the set of records you’re permitted to read, whereas restrictive policies will restrict you from reading a particular record, even if there exists a permissive policy that grants you access to said record.
You have to have at least one permissive policy to be able to query the table. A table with only restrictive policies will not allow any queries at all.
Permissive policies are applied using a boolean “OR”, so you only need permission from one permissive policy to be able to query a certain row. Restrictive policies, on the other hand, are applied using a boolean “AND” — you have to pass all restrictive policies for every row you want to be able to read.
The overall logic looks something like this:

I don’t often find myself reaching for a restrictive policy, preferring to use use a slightly more complex permissive policy instead, as it keeps things closer together and easier to reason about.
Moving on:

The [to] portion of [create policy] defines the roles the policy applies to. In this case, I’m using an example group called [authenticated], but this could be any group you like, or one of the Postgres defaults: [PUBLIC], [CURRENT_ROLE], [CURRENT_USER], [SESSION_USER]. These are based on the user creating the RLS policy, not the user querying! It’s best to target a specific role.
Beware, however, that any role with the [bypassrls] attribute will completely ignore any RLS policies you have defined!

Finally, the good part! This is where the action happens. The [using] clause contains a boolean expression that each of our rows is checked against.
There are two available check clauses: [using] and [with check].
[using] is used to determine which rows are visible to the user when the operation is performed. It’s used in [select], [update] and [delete] clauses. In the case of [update] or [delete], if you use Postgres triggers as part of your application, the using clause will be checked after any [before] triggers have run against the relevant rows.
[with check] is used to check that the results of [update] and [insert] statement are up to snuff. These policies will run after the action, but will prevent the action being committed if they fail. In the case of [update], you can use [with check] in combination with using to create some really powerful policies.
You can think of the flow like this:

You can use any boolean expression in your [using] and [with check] clauses including function invocations. The only requirement is that the expression returns a boolean value.
For example, you could replace the above policy with the following:

Rather than using a simple inline policy, we are now passing the [animal] record that the query is being run against to a function called [can_read_animal_using]. This function checks that the animal’s species is a lion — returning [true] in the case that it is, [false] otherwise.
There are many good reasons for adopting a pattern of using functions rather than inline policies, and we’ll dive deeper into this in another article. For now though, let’s take a look at how you might implement a useful set of RLS policies this in a production system.
RLS in production
At Pluto, we use a Postgres database hosted on Supabase. Supabase provides authentication and its client libraries will set some variables in your database that make it really easy to see which user is making a particular query. Supabase leans heavily on RLS policies for user access control, and they have their own guide on the topic.
Supabase databases come pre-built with a schema called [auth]. The auth schema contains a function called [uid( )] which returns the current user’s unique ID as defined in the [auth.users] table.
However, we can quite easily replicate these features ourselves. Supabase’s client libraries simply use the user’s JWT and set some config on a per-request basis (assume anything in { } is replaced):
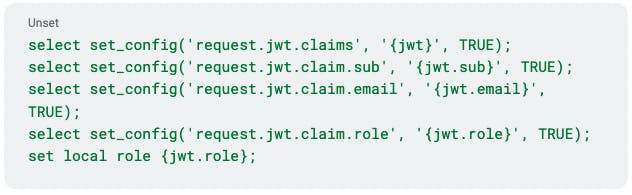
In this case, you’ll want to make sure your JWT role is the same as the role you’re applying the RLS policies to (e.g. [authenticated]).
The UID function is defined as:

This returns the ID of the user as it’s defined in Supabase’s [auth.users] table. Of course, if you use a different structure, you can choose to adjust the function accordingly.
Recipe app
Let’s pretend we’re making a social recipe-sharing app. Users can create recipes which are then visible to all of our other users. However, users should only be able to insert recipes that they authored, and shouldn’t be able to update or delete other users’ recipes.
The example will assume you’re using the same table structure as Supabase with an [auth.users] table and [auth.uid( )] function.
Note that our policies will only apply to authenticated users. Anonymous users (not signed in) should be able to read all recipes, but not do anything else.
As a first step, let’s define our table:

Our first policy will allow all users to read all recipes:

However, only the recipe owner should be able to create, update or delete recipes. Whilst we’re at it, let’s also make sure that users can’t insert recipes with no content! Even though we’ve defined the column as [not null], a user could still insert an empty string, which we don’t want.

Now we have the rules we want: anyone can read recipes, but only the recipe author can actually manage (update, delete) the recipe.
One of the really nice properties of RLS policies is that they enforce a separation of concerns between the security of your database and your business logic. A good example of this is that I wanted to update all of my recipe titles at the same time, I could simply do the following:

And only my recipes would be updated!
Neat, right?
As all of this happens at the database level, there’s no need to worry about writing [where] clauses everywhere or complicating your codebase with security concerns that really belong with Postgres.
---------------------
I hope this has been a useful introduction to Postgres RLS policies. We make extensive use of Supabase and row-level security at Pluto, so we’ve picked up a lot of useful tips, tricks and best practices for keeping your RLS policies readable, maintainable and performant.
Stay secure out there!

Was this content useful?
Find relevant positions
Message teams directly on cord

Senior Designer, Performance Marketing at CreditSpring
Senior Network Engineer at Trellint
You might also like

Architecture
Simple Scheduling with Google Workflows
Ian Fuller, CTO at Investa explains how Google Workflows can be used to orchestrate your pipelines.
Architecture
Scaling Muzz Social to over a million users on day one
Alex Bilbie, Head of Engineering at Muzz breaks down the architectural design patterns and AWS services used to build a responsive, real-time, scalable application for the launch of their new Muzz Social.